Water Testing 101
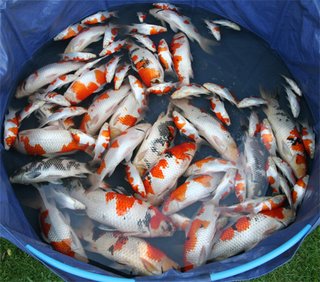
Well hopefully by now most of you understand how important testing you water is in keeping fish alive and healthy. As well, I hope that not too many of you learned this the hard way. I can’t tell you how many times folks come to the farm that have had ponds for years, and they tell me they have never tested their water. I then proceed to tell them how lucky they have been, and that it is simply a matter of time before they lose all their fish to water quality issues. Some take my advice and learn about and begin testing. Some don’t and they always come back to restock their ponds at some point after they do kill them all. These are my favorite customers, as I can sell them lots of new fish. Not really. I hate to see people kill their entire population of pets. I have a sign posted at the farm that reads like this; “Don’t test your water? That’s ok…… I have plenty more fish to sell you when you kill those”. Hopefully this helps get the message across before they kill their fish.
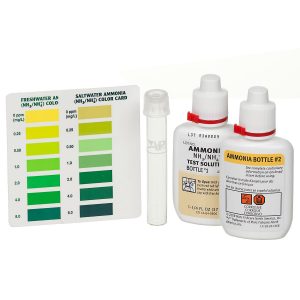
As for the type of test kits to use, I recommend the liquid dropper type kits. Specifically I use and recommend the type made by Aquarium Pharmaceuticals (AP for short) under the name Pond Care. We will discuss their use in detail in a minute.
I DO NOT recommend using the “strip” type kits as these are inaccurate and inconsistent. These are the type that utilize specially treated strips of special paper that react with various color changes when dipped into the sample water. They are then compared to color charts of some sort. Things like humidity, temperature, and light all contribute to the inaccuracies of these tests. If they are not stored properly, you will get bad readings. Even when they are stored properly they are very inaccurate. So don’t waste your time or money on these types of tests.
As previously mentioned above, Aquarium Pharmaceuticals (AP) are the kind I recommend, as they are reasonably priced and accurate enough as well. These utilize liquid reagents put into a measured vial of water and then compared to a color chart. Each test for various parameters usually have a different set of colors and color chart that are associated with them.
Before going further however, I would like to stop here and say one thing regarding certain recommendations that are given for certain tests/test results. Based on various results, AP and other manufacturers give recommendations as to what are safe levels of certain toxins, as well as what to do to remedy certain things when the parameters are not favorable. IGNORE THEIR RECOMMENDATIONS from their instruction sheets as they are quite often incorrect and can even be harmful to fish at times. AP’s directions are fairly good, except for the kH test, but I will say that they market certain other products like Stress coat and Stresszyme based on the test results you may get. I do not recommend either of these products AT ALL. Also, certain other test kit manufacturers (not AP) suggest that low levels of ammonia and/or nitrite are may be OK. There is no such thing as safe levels of ammonia or nitrite. I am here to tell you that you need ZERO ammonia and ZERO nitrite and zero is the only safe level of either of these toxins. If you have any amount of either of these in the pond, you should add an ammonia binder for the ammonia, and/or salt at .02% (point zero two percent) for every one ppm of nitrite.
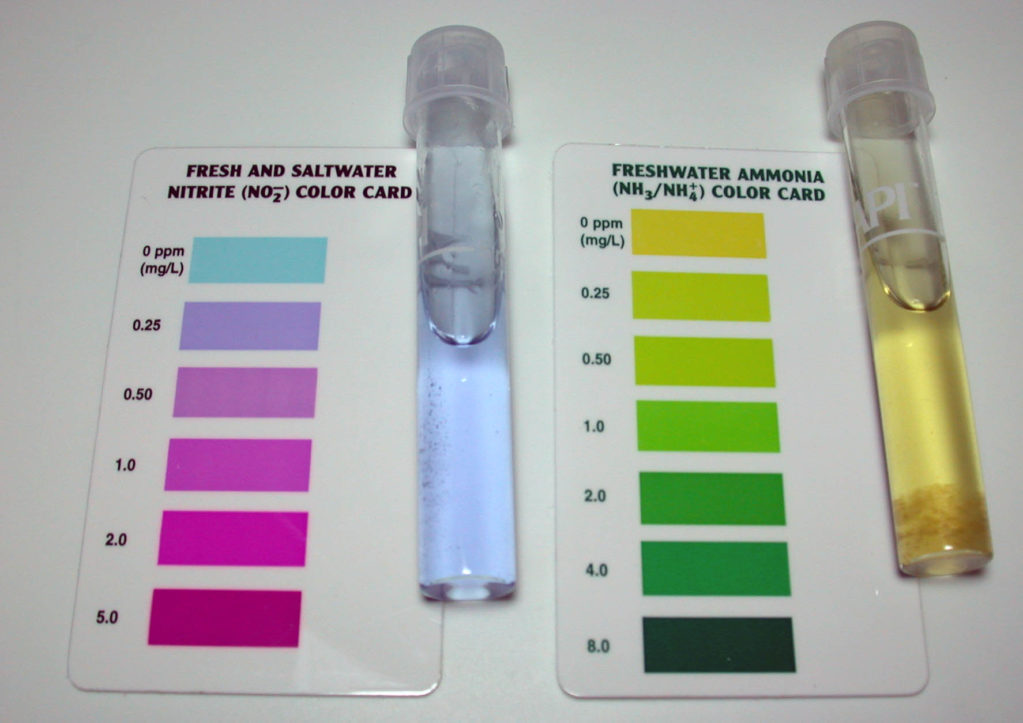
Now with that said, you have to understand, however, that adding ammonia binder for ammonia and salt for nitrite does not make these toxins go away. They will, however, protect the fish until they do go away through the nitrification process. As for ammonia binders, they to will not make ammonia go away, as stated, but they simply bind it and/or turn it into a non toxic form. There are, however, some ammonia removers on the market, so know which you may be using. You will still read ammonia with the ammonia binders on certain types of ammonia test kits, and this is what you desire. Whether bound or not, you need to know when the ammonia is still there and when it goes away. For example, AP make a Nesslers type of ammonia test kit. This utilizes only one reagent for testing and if you add certain ammonia binders or inhibitors you can get false readings. This is why I recommend the salicylate type of ammonia test. AP offers both types so make sure you get the one that incorporates two reagents for each test. This is the salicylate type that has two liquid reagents you need to add for each testing of ammonia.
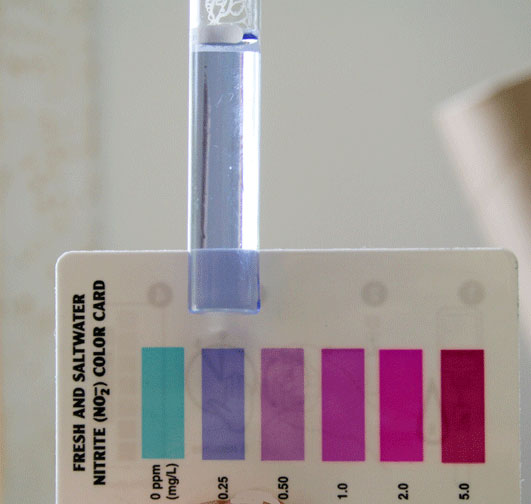
Now talking specifically about the AP test kits, let go over some hints and suggestions I have for you. Firstly let’s discuss how to properly look at and compare the test color to the chart colors. Any of the AP kits that have a color chart can and should be read this same way. One of the most important things is to hold the test vial just at the top of the colors on each chart as shown in the photo below. Actually, I usually position it so that the bottom of the vial is even with the top of the color we are comparing the sample to. In the photo it is shown positioned slightly above the color on the chart, and this can make it tough to compare at times. So try holding it the way I describe and make the bottom of the vial even with the top of the color on the chart.
Another hint when you are having trouble discerning the colors is to close your least dominant eye and use only the dominant eye to look at the colors.
Now the biggest thing to remember with these AP tests is to NOT hold the vial directly against the color chart. Instead hold it about 1/4″ to 1/2″ off of the white background of the card as shown in the photo below.
Note the distance between the vile and the color chart card below

Another important aspect of testing with the AP kits is to follow the directions exactly when it comes to the times you must wait for certain tests to complete. For example, the ammonia and nitrite tests require that you wait five minutes after mixing the reagents with the test water. It is very important to time this accurately because if you do it too soon or too late you will get incorrect readings possibly. You need to wait the five minutes to read the colors not 4 minutes and not 6 minutes or longer.
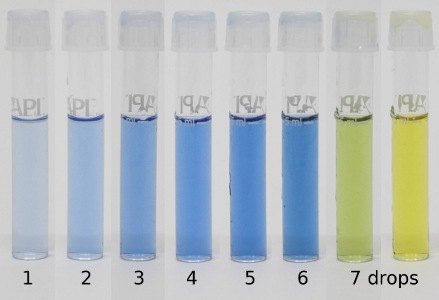
Another important test is kH. AP also makes a good kit for this. However, sometimes there is confusion with their direction sheet. It seems they use the same direction sheet to discuss both kH (carbonate hardness) and GH (general hardness). These are not the same so make sure you follow the correct directions for kH. With this test there is no color chart. Instead you add one drop of reagent to the test vial and count the number of drops it takes for the water to turn from blue to yellow. It is therefore critical to do this test one drop at a time because the exact drop it takes that turns the water from blue to yellow is the number your kH is. As an example, the first drop should turn the sample water blue. If it does not turn blue on the first drop then your kH is too low to measure with this test kits, and you surely need to increase it with baking soda. You can read about this in the article on my website entitled “The Science of Water“. So for the sake of this example let’s say the first drop you put in the sample turns the water blue. Now take the cap off the vial and add the second drop, recap and invert the vial. If the water is still blue you continue these same steps (one drop at a time) and be sure to count the number of drops. Whatever number drops it takes to turn the water from blue to yellow is your kH reading in degrees of German hardness. So for the sake of this example if on the third drop the water turns from blue to yellow, then your kH would be 3 degrees of German hardness. You can refer to the article above to read more about kH and its importance in your pond. It is one of the most important parameters to monitor, and it needs to be maintained at certain levels with the addition of baking soda.
Written by John Fornaro, Hanover Koi Farms. ALL RIGHTS RESERVED BY HANOVER KOI FARMS, COPYRIGHT © 2017