Koi Treatments
In this section I give you some of the more common treatments we utilize here at the farm. I have left out some of the more dangerous ones that would easily kill your fish if you made even the slightest mistake. The ones I have included however will help with most of the common Koi and Goldfish ailments.
All or most of these treatment medications are available in our online store under Medications
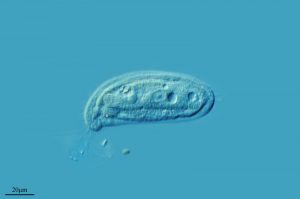
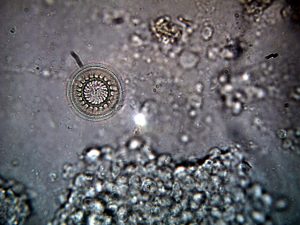
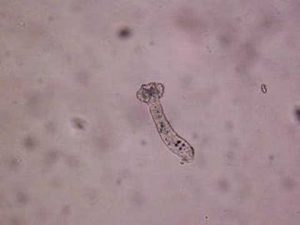
Basically put there are six primary types of pathogens that can attack your fish. They are protozoan parasite, Trematodes/nematodes, Crustacean parasites, bacterial infections, fungus and lastly viruses.
Of these six we can pretty much get rid of most viruses as they are not curable. Some are deadly and some not. So for the sake of this article we will be discussing only the remaining five types of pathogens, and their treatments.
So we are left with Protozoan parasite, Trematodes/nematodes, crustacean parasites, fungal and bacterial infections. Of these four we will class the protozoan, Trematodes/nematodes and Crustaceans into the primary group and simply call them parasites. These are the most common and treated successfully, but each one does require a specific and separate treatment. We will put bacterial and fungal infections in a class by themselves as these are usually secondary infections that arise after the other three cause the initial problem. In other words parasites usually lead to bacterial and/or fungal infections if not caught early enough.
Regardless of the Type of Pathogen, I ALWAYS Start with Salt
Salt greatly helps sick fish with stress, kills or slows pathogens, and helps the fish rebuild or maintain slime coat integrity. Anytime my fish are ailing I ALWAYS start with adding salt to the system. How much salt depends totally on what I am fighting at the time. Salt is also used to protect fish from Nitrite. Now with this all said, many folks have gotten the mistaken idea that if salt does all of this that they should keep it in their ponds at all times. This is a VERY incorrect assumption.
Salt is only to be used as a medication, a form of chemotherapy, a pathogen treatment, or to protect fish from nitrite poisoning if you have nitrite in your pond. YOU SHOULD NOT KEEP SALT IN THE SYSTEM AT ALL TIMES!
If you do this you are hurting the fish due to long term salinity exposure, possibly stressing them further if you change the salinity too quickly, and creating salt resistant pathogens. Maintaining a constant salinity in the pond would be equivalent to you taking antibiotics on a daily basis even when you weren’t sick. Eventually all the bacteria in your body would become resistant to that antibiotic and it would not be effective when you truly needed it. The same holds true for overuse of salt. Salt treatments should not be taken to lightly. It needs to be done correctly and sparingly but it is an extremely effective treatment when done correctly.
DO NOT USE SALT DIPS!
Regardless of what you have read or been told DO NOT USE SALT DIPS FOR AILING FISH! Salt dips are when you mix a high concentration of salt in water and dip the fish in for five minutes. No matter the source you may have gotten this false information of salt dipping, I can assure you that that source is very wrong and knows little about Koi physiology and health. These high concentrations of salt dips do NOTHING to help the fish or to get rid of any disease or parasite. All these dips do is destroy the fish’s gills and slime coat, and put the fish in further stress.. Two things you do not want to do to ailing fish. Salt baths for extended periods from point one percent up to point 6% salinity are far better. You can read more below.
So always try salt first if you have sick fish and if this doesn’t work then you should consider the other methods of treatments listed below, and especially the “Shotgun Treatments”. This is especially true if you don’t have a microscope! The shotgun method is what most hobbyist are forced to do and therefore the most common method of treating when salt fails to do the job. If salt fails to fix your ailing fish and you do not have the knowledge or a microscope I would highly recommend you use one of the shotgun treatments outlined below.
So What is a “Shotgun Treatment”?
Shotgun treatments are simply a combination of treatments/medications used to cover a full spectrum of the most common bugs. I would never only treat for one type of pathogen with only one type of treatments even if I knew what it was. As well there is no cure-all when it comes to treatments/medications. If you are going to treat because the salt failed, make sure to cover all the common bugs that affect the fish, and this means you will need a few treatments/medications to do this.
Know the TRUE Volume
Before You Add Anything to Your Pond – Find The TRUE Gallons in Your System
I would also like to emphasize the critical importance of knowing the exact gallons of your pond or tank before attempting any treatments. This is the number one cause of failure to achieve positive results, and you might harm or even kill the fish in your attempt to treat them with anything stronger than salt.
Some folks have measured the pond and used the formula L x W x avg. depth x 7.48 to calculate their volume. If you try this you will most likely overestimate your volume by 25% to 50% so I do not recommend this method unless you have a square or rectangular pond with straight sides and a flat bottom. While this formula is correct and accurate, how it is applied to the irregular shape of most ponds is not! The ponds in many cases do not have straight side walls for one, and the average depth you decide to use is not accurate as well in many cases. If you were off even by a little on that average depth guess, it would throw off this calculation by a lot! As a matter of fact this is exactly where most people go wrong in using this formula to calculate their pond volume. Things like plant shelves, sloping bottoms and so on will all contribute to a false end result. Now if you have a tank with straight side walls, a perfectly flat bottom and it was a normal geometric shape like a square or rectangle, then you can easily apply this measurement formula to get accurate results. Most ponds are not designed like perfect geometrical shapes however.
So you can begin to see, the easiest and safest way to find out the exact gallons of your system or pond is to use salt. A know amount of salt in weight, mixed in the system or pond will give you a known salinity. So you can use this fact to calculate your pond volume using the salt /salinity method. You will need a salinity meter to be able to accurately test the salinity of the system and accomplish this volume calculation. We sell them in our online store under Meters. If you have a pond you will need a salinity meter for other purposes besides this volume calculation. Since salt is utilized in all treatment protocols, this will be a good way to get a more accurate volume calculation BEFORE attempting use of stronger and more dangerous medications.
Using Salt and a Salinity Meter to Calculate System Volume
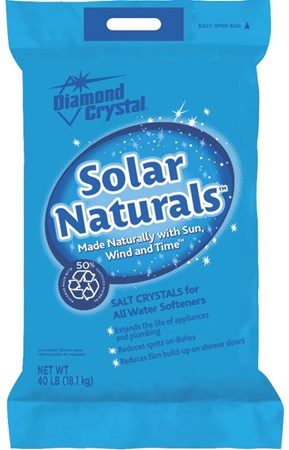
The type of salt used should be 99.9% sodium chloride, with no additives or preservatives, and especially do not use salt containing YPS. (Yellow Prussiate of Soda). I use water softener salt, which is very inexpensive, but be aware that not all brands meet these specifications. So check the label first. You can find such salt at most of the home improvement super stores. We get ours from Lowes under the brand name of Solar Naturals. These are marble sized irregular shaped salt in crystal form. DO NOT WASTE YOUR MONEY ON SO CALLED “POND SALT” SOLD IN OTHER PLACES. This is the same salt that I am telling you to get at Lowes, and those places selling “Pond Salt” are really ripping you off with prices marked up 10-20 times!
If you want to figure your volume using salt make sure they are not calling for rain as this will throw off the whole thing. The same holds true for adding water or having auto fill lines on while you are doing the salt test for volume.
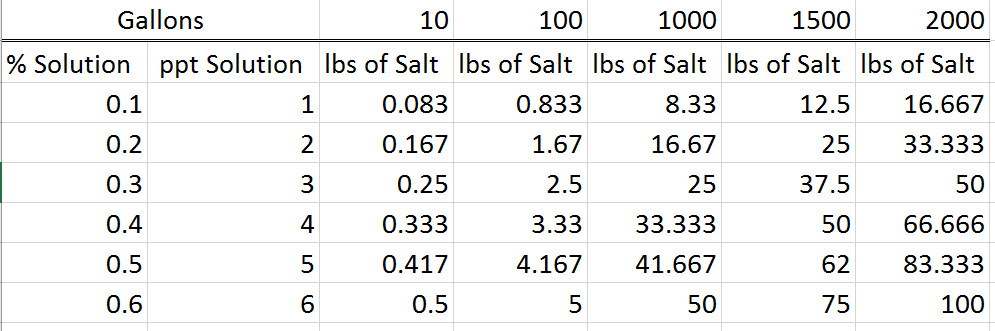
As previously stated .833 (point eight three three) lbs of salt mixed well and completely in 100 gallons of water will give you a salinity of .1% (point one percent ) So if you added .833 lbs of salt for every 100 gallons in your pond you would end up with a .1% t salinity. I give you an example below of how to use this fact to calculate your system/pond volume. Please note that with this example our salinity meter reads in % (percentage salinity). If you meter reads in PPM pr PPT instead you need to convert to percent or use the calculators we have supplied.
Let’s say you believe guess your pond or tank holds 200 gallons of water. Let’s also say your guess is based on that formula we discussed earlier, or you are simply pulling your guess out of your sleeve. Either way you should be fine because it would take an overdose of about ten times the salt to hurt the fish. I would not worry too much overdosing salt.
So once again to achieve a salt solution of .1% , utilize the chart below, and you will note that you need to add .833 pounds of salt for every 100 gallons of water.
So, in this case you are estimating your pond or tank to be 200 gallons, so multiply .833 times 2 (for 200 gal) and you get 1.666. This means you would need to add 1.666 Lbs. of salt to achieve the .1% solution for 200 gallons of water.
Salt Chart
For smaller volumes of water you can use one level teaspoon of salt
for every gallon of water to achieve a .1% (1 ppt) solution.
It is important to measure for salt content/salinity of the system prior to adding any salt for this calculation. This is because some water supplies have a slight salinity, from various other salts found in water that salt meters may read as salinity. So take this reading and record it for future reference if you do get a reading other than zero.
Using the example pond of an estimated 200 gallons above, now add your 1.666 lbs of salt to the system. You DO NOT want to just dump this salt directly in the pond however. If you did the salt crystals would sit on the bottom and not dissolve very well without water flowing there. As well, the salt crystals create heat and in cooler water the fish would be attracted to that heat and sit directly near the crystals. This can give them a chemical burn due to the high salinity concentration right at the salt as it slowly dissolves.
So when adding salt I prefer to add it to the skimmer. If you don’t have a skimmer then you could just add it to the top of your waterfall filter, in a stream if you have one, or anywhere there is running water from the pond that is not directly in the pond with the fish. If you have none of these preferred spots, then simply pre-dilute the crystals in a bucket of water and disperse that water evenly throughout the system/pond.
The Actual Steps & Math
It is also important to use an accurate scale when weighing the salt.
The math and steps involved to determine gallons utilizing salt are fairly simple:
1.)Take a sample cup of the water from the pond and measure the salinity percentage/% , parts per thousand/ ppt, or parts per million/ ppm by sticking the meter in the sample cup of water. I do not recommend sticking the meter directly in the pond as you can sometimes get interference and false readings. For this reason always test a cup of the pond water .
The formula we are about to give you only works when the salinity reading is in percentage % form. So if your salt meter gives you reading in ppm or ppt instead, you must use the calculators we have supplied below to convert those reading to percent %.
2) Based on your best guess of your gallons, add .83 pounds of salt for every 100 gallons of pond water, and give the salt at least twenty four hours to mix completely and evenly thru the system.
3)After the salt has been allowed to mix through the system for 24 hours measure the salt content again using the meter and record this reading. If you had any salinity on your first reading you did before adding the salt, you will need to subtract that reading from this new second one. This will give you the percentage the salinity changed. If the first reading was zero, simply use the second reading. Don’t forget to convert all readings to the percentage form using the calculators supplied below.
As an example if the first reading was zero and the second reading is .15% (point one five percent), then the salinity change was .15% . Again we want to use the % form of this reading, so in this case we are looking at .15% (point one five percent.)
4) Now multiply the pounds of salt you added to the pond by the constant of 12. You will always use the 12 in the future as well. ( in the case of the example 200 gallon pond the salt added was 1.67 lbs.
So 1.67 x 12 = 20.04
5) Now divide the answer of #4 (20.04) by the percentage salinity or salinity change.
20.04 divided by .15 = 133.6 gallons in pond
The answer here gives you the volume of your pond in gallons. In the case of this example that would be 133 gallon pond.
Do not be surprised if the true volume is well below what you originally guessed because most folks are from 25% to 50% to high on their estimates when they calculated the volume by measuring the pond.
One other consideration in using salt, especially on very weak or ill fish, is not to over stress the fish by jumping right in with solutions higher than .1% . What I mean, is you should stage the additions in .1% increments, each separated by eight 24 hours or so. As an example, if your goal was a .3% (point 3 percent) final solution, then add .1% (point one percent) now, another .1% (point one percent) in twenty four hours, and the final .1%(point one percent) twenty four hours after that. Do not forget to test the salinity JUST BEFORE each new addition of salt.
With very weak fish sometimes I only dose half of .1% (point one percent ) and use only .05% (point zero five percent)The same holds true if I am only using salt to figure the volume and am not treating sick fish or nitrite in the water. Anyway that should give you an idea how to figure you gallons using salt, and also how not to use salt. Just remember that salt is a treatment and should be respected and treated as such. Now let’s move right in to how to use salt as a treatments.
You can also use one of the Pond Volume Calculators below to do the math for you. Different salt meters read in different units: Percent, PPT, or PPM. Below you’ll find a calculator that works for each of these. Be sure to use the calculator that uses the same units as your salt meter!
Just type in your initial (before adding salt ) salt reading, the lbs of salt you added, and the final (after adding salt) salt reading. The calculator will run automatically once you enter these numbers.
Water Changes & Additions
More fish are killed or hurt with improperly done water changes than any other reason, next to poor water quality and not testing the water in the pond.
Most people do not realize just how complex water actually is, or understand all of the chemical and biological activities that are associated with it when it comes to housing fish. These chemical and biological processes are constantly trying to change the waters basic makeup, and it is important that you control these changes, and keep it as healthy and STABLE as possible for fish. Water changes and additions that are done incorrectly can harm or even kill your fish! This is especially true when your source/new water is tap/city water that has chlorine or chloramines in it!
Understand that a fish’s body is basically comprised of fluid, (just as human bodies are), and most of that fluid is in the form of water. That given, this makes fish bags of water, separated by a thin membrane, (their skin and scales) living in a water environment. Basically put, they are the water; therefore, any change that occurs in the water will instantly affect the fish. In nature, these changes occur slowly, but in the small, recirculating environments of our ponds or tanks they may occur too quickly and harm the fish. Fish require stability in the water to stay healthy, especially when it comes to parameters such as temperature, pH, and many other things as well. This is discussed in detail in the other articles such as The Science of Water.
Not only are water changes required during and after certain treatments, they should also be done for general health and maintenance of your pond or tank. Let’s just say that water gets “used up” after a given period of time, and will have to be freshened with the addition of new water.
I cringe every time I see the blanket statements that you should change your water or a percentage of it every week or month or whatever!
You will hear many varied opinions as to how often routine water changes are required, but the frequency and percentage of change totally depend on all of the variables associated with YOUR pond , tank, or the treatment protocols listed above, as well as the condition of your source water, be it well or tap water. In my opinion, when it comes to routine water changes, no one can tell you how often you will need to do them. What does determine the amount and frequency of water changes should totally be dictated by testing your water for pH, kH, ammonia, nitrite, and nitrate to name the most critical, as well as the treatment protocols listed above.
I can tell you right now that folks that have chlorinated source water may not want to do as frequent water changes as some that have well water. This is because water changes and additions with chlorinated water MUST be done in a very specific way!
Other variables such as dissolved organic compounds (foamy water), algae blooms, mineral content, and fish load will also play a role.
Now, understanding how a change in water chemistry can affect the fish, it is vital to know the parameters of the new source water, as compared to the ( existing or existing to remain), pond or tank water. The number one parameter to be concerned with first is the temperature, followed a close second by pH. As mentioned above, you need to compare the parameters of the new water to the existing to remain water, or the water that is to be removed. The more different they are in temperature and pH, the slower the change needs to be done.
Normally, if there is a difference in temperature of more than 5 degrees between the new and existing water, and you are doing more than a 20% change, you need to be careful, especially if the new water is colder than the existing water. This is especially true when it comes to fish that are less than 6 inches or so. These little ones you need the temps to be within a degree to keep them safe!(Anything less than a 20% water change will usually not be a serious consideration, and will not affect the fish if there are slight differences.)
If you add water that is colder too quickly, you are in danger of cold-shocking the fish, and this is especially true the smaller the fish. Remember stability? In nature, the mid to lower depth water temperature does not change quickly, only the surface temperature does, and the fish can easily escape the change on the surface by retreating to the deeper depths. In most cases, our shallow ornamental ponds don’t afford them this option, as the temperature is fairly consistent from surface to bottom. Therefore, if you are forced to add colder water to the tank or pond, do it as slowly as possible, as not to change the existing temperature in the pond or tank more than one degree an hour. The larger the difference though, the slower you will want to do it. In other words, if you are adding water that is 50 degrees to a pond or tank that is 75 degrees, you may only want to see a change of one degree every two hours. The slower the change the better with as large a difference in temperatures as this.
The pH is also a critical parameter to consider when doing a water change. The pH scale is logarithmic, and for every change in pH of one point, the pH has changed tenfold. For example, a pH of 8 is one hundred times more alkaline than a pH of 7, so as you can see, even a minor difference in readings is a substantial chemical change. Another consideration is whether your existing water contains any ammonia, as this compound becomes increasingly more toxic as the pH rises above 7. In other words, the higher the pH is above 7, the more poisonous any ammonia in the water becomes. So in the case you are doing a water change to dilute out any ammonia, make sure you realize the pH of the new water, and if it is above 7, you should also add some type of ammonia binder or detoxifier as well.
Water Changes with Chlorinated Water Sources
DANGER, DANGER DANGER!!!!!!!!!!!!!
If your source water is “city” water that contains chlorine or chloramines it is critical to be VERY careful doing water exchanges. If done incorrectly, these types of water changes or additions that have ANY form or ANY concentration of chlorine or chloramines will hurt or even kill your fish and your biological filter! At minimum if done incorrectly and the fish live thru it, their lives will be shortened substantially if the water addition or change is not done correctly!
As most of you may know, local municipalities add various chemicals to the water to make it safe for human consumption. The two most common chemicals used are chlorine and chloramines, and both are deadly in ANY concentration to fish! It is for this reason that this type of source water must be treated with a dechlorinator properly, and made safe for fish. This dechlorination MUST be done BEFORE the fish come into any contact with these deadly chemicals! Remember these chemicals even at the lowest concentrations are deadly to the fish!
To understand how to do water changes and additions safely, you must understand the whole nature of how, when and why municipalities make water safe for humans with the additions of chemicals such as chlorine and chloramines.
All over the USA domestic water is obtained from various sources. Reservoirs, wells, storage tanks etc. This water is commonly treated with chemicals as discussed when speaking of city or tap water. This treatment is done to kill any harmful bacteria and such that can make people ill. This can also be the case in some housing developments or small towns that use a common well to supply the water to the local residents. The housing developments, small towns , and even places like fairgrounds and other public type places sometimes have their own smaller treatment facilities that they themselves control and maintain on a local basis. In other words the state government is not involved in the treatment or monitoring of these type treatment facilities. These place sill however are supposed to be using state and federal guidelines for treating these waters to make them safe for people. However, as you can imagine, without strict regulations by larger government, these small places can and do under and overdose these chemicals occasionally.
According to EPA guidelines, they want to see at least .3(point three) ppm(parts per million) chlorine to each end user of that water. This is considered the lowest level of chlorine that will do the job killing any harmful bacteria or contaminants in the water supply. As well they do not want more than 3 to 4 ppm total chlorine going to any household as this amount can make people sick as well.
Now knowing these facts, understand that chlorine dissipates due to certain variables like , contaminant levels, as well as the distance it is being pumped. As the water moves down the line to each household some chlorine is lost. So this means that the water coming from the treatments plant cannot have a greater concentration of chlorine than the 3-4 PPM and still must maintain the minimum level of ‘3 (point three) ppm by the time it gets to the last user in line and farthest from the treatment plant.
What this means is that depending on these variables of distance, contaminants and other factors the water directly out of the treatment plant may have higher levels to start with. I have seen levels up to 10ppm in some places right out of the plants. This is dangerously high, but based on those variables by the time it get to the first house in line from the treatments facility contaminants and such have caused most of that 10ppm to be used up or dissipated. Remember, the goal to get the minimum level of disinfectant to each and every household yet keeping anyone from getting an overdose above 3PPM total. Understand as well that chlorine levels can be adjusted and raised and lowered based on other seasonal factors, as well as flooding and such in the reservoirs. Below is a diagram to illustrate the process;

So what does all this mean to you? In short it means you need to test your chlorine level of your source water each time you do any major water changes or additions. Remember that your levels can change as discussed, so to properly dechlorinate your water to make it safe for fish, you must know what level of chlorine you are treating. This means you need a PROPER chlorine test kit that is dependable and accurate. We have these in our online store here;
How to Properly Dechlorinate Water
As discussed ANY amount of chlorine or chloramines is harmful to fish! This water must be properly treated and dechlorinated BEFORE it ever comes in contact with your fish or filter. It also means you need a chlorine test kit and test the chlorine level at the time of the water change or addition. Once you know the ppm of total chlorine you can then determine how large a dose of the dechlorinator to be used.
Once you have determined the chlorine level and the proper dose of dechlorinator to be used per gallon it is easiest to have a tub, barrel or other holding system with a KNOWN gallonage or volume. Things like a 55 gallon drum, kiddy pool or whatever you know the true gallons it holds. Then you fill that container with the new chlorinated water. Now you add the appropriate dose of dechlorinator and mix thoroughly. Once mixed, you can dump or pump that water in the pond or tank that holds the fish. In this manner the new water has been properly dechlorinated and will be safe for the fish and you filter. This is the ONLY way to be sure the water is safe for the fish and properly dechlorinated.
DO NOT attempt to drain water from the pond, then make a guess on how many gallons you removed that will be replaced and try to add dechlorinator and then filling system again. Firstly it is a huge guess as to how many gallons you took out and thus added back, and secondly the water will not get fully dechlorinated or fast enough to be safe for fish.
Well water Changes and Additions
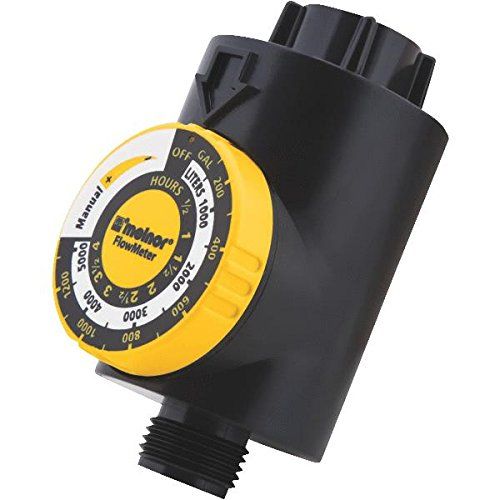
In addition to the precautions discussed in the beginning of this article, it is also a good idea even when you have well water to use a cheap water meter you can buy at your local home improvement store. These meters have selectable time frames you can choose for the hose run time. They hook directly to any standard hose connection and can be set to run as long as you choose and then automatically shut off. With these installed there is little chance of forgetting turning off the hose and killing you fish with temp shock or large pH changes.
Written by John Fornaro, Hanover Koi Farms. ALL RIGHTS RESERVED BY HANOVER KOI FARMS, COPYRIGHT © 2018
Salt for Nitrite
As discussed above salt can be utilized when our ponds or systems get nitrite spikes. (please note we are talking nitrite with an “i” and not nitrate with an “a”). With a newly cycling biological filter you should know by now where nitrite comes from and why. If you don’t you will need to read the article The Science of Water on this website.
Nitrite poisoning is also called brown blood disease in fish. If fish are subjected to nitrite too long they will get this disease of the blood and die. Salt can protect the fish from this nitrite poisoning until the nitrite eventually goes away as a result of the nitrogen cycle.
To protect fish you need to have a salinity of .002% (point zero zero two percent) for every 1 ppm (part per million) of nitrite in the system. This means if you had 2 ppm nitrite you would need .004% (point zero zero four percent) salinity to protect the fish. If you had 3 PPM nitrite you would need .006% salinity to protect the fish, and so on and so forth.
NOTE: If your salt meter reads in other than percent you can use the conversion calculator at the top of this page to convert to percentage from ppm or ppt.
Now you may be saying that is such a low level of salinity why don’t I just add .1% at the first signs of nitrite? We all know the nitrite will be increasing most likely until the nitrogen cycle completes. Well the reason we want to use the minimum amount of salt/salinity we can to protect the fish is because the bacteria that will eventually show up to process the nitrite are extremely sensitive to any salinity in the water. For this reason we need to keep the salt as low as possible. If we put more than we need then we are actually slowing those bacteria from colonizing and thus will have higher nitrite and for a longer period of time.
So in summary if you get nitrite in your system only add .002% salinity for every 1 ppm nitrite as needed until the nitrite is gone.
Salt as a Treatment
Different percentages of salt have different uses and different levels of effectiveness against certain pathogens. Below I will break these down into the most widely used salinity levels used for Koi.
Salt at .1% Solution
I use this treatment primarily as a stress reducer or as the initial dosage when staging dosages to get to the higher percentage solution. Salt at this level will have a calming effect on the fish as well as not kill most plants too quickly. As a stress reducer, it is used in situations such as after major emergency water changes, or when you have relocated the fish to a new body of water. (As in such cases when I take fish from the mud ponds and relocate them to the quarantine tanks.) At the first sign of any illness or stress, this is always the first treatment I do, especially when treating a pond that houses plants. It will also slow down any attacking pathogens, as well as promote the fish to create more slime coat, and as mentioned earlier, this slime coat is vital to the fish’s immune system integrity.
As mentioned above, it should also be used as the base amount when trying to achieve higher, final salt solutions. In other words, if I wanted to take the fish to a .3% solution, I would start them off at .1% the first day, and repeat this daily until I get to the percentage I am trying to achieve. So, unless it is an emergency, start the fish at this level, and gradually (every twenty four hours) add more until you get to the desired percentage. Please refer to the notes and chart above for other important details.
Salt at .2% Solution
This treatment is also utilized as a stress reducer and slime coat enhancer. In addition, it will do a slightly better job at slowing certain protozoan parasites, such as Trichodina, Ich, and Chilodonella. However, I would not use it as the sole means of eradicating these bugs. This salt level may harm certain plants in the pond, so you may consider removing them.
Salt at .3% Solution
When used alone, this is the number one salt treatment that will usually slow the reproduction rates of most protozoan parasites as well as some Flukes. If you suspect flukes to be the primary culprit, however, I would use one of the two fluke treatments listed below, in addition to the salt. Salt at this level would be the treatment of choice when attempting a safe, inexpensive treatment, but it will kill most plants when left in a pond for any period of time. So, if treating a pond with plants, be prepared to remove them or sacrifice them.
If you are a novice, and for whatever reason you can’t or won’t use other medications such as the ones listed below, then this is the best starting treatment for parasites and even certain bacteria. Also, be aware that there are some salt resistant parasites out there that may not respond to this treatment, and today that is increasingly becoming the case. This is not as uncommon as some people state though. If you are using this treatment, give the fish up to one to two weeks to show signs of improvement. If they do not, or they worsen, you should consider one of the other medications. Some of the so called experts might disagree with this thinking, but these treatments are specifically designed for the novice, and salt is always a safe choice for beginners.
Please refer to the notes and chart above for other important details regarding the use of salt.
Salt at .6% Solution
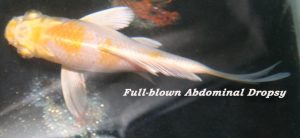
There are very few times I would suggest these levels be used by the hobbyist, and you are much better off just going with the other medications listed below. No plants will survive this treatment. One of the primary times I use this is for cases of Dropsy and/or ulcers. Please refer to Koi Symptom Diagnosis.
This solution was primarily used by some breeders to kill the salt resistant protozoan parasites that are primarily found on imported fish, or fish that have not responded to the .3% solution, and are extremely overcrowded. Today, however, even these higher levels of salt have little killing power when it comes to parasites, and there are better medications available. Again, please refer to the notes and chart above for other important details regarding the use of salt.
Heat as a Treatment
Heat & Salt
As discussed earlier, heating the water at least to the mid to upper seventies is very conducive to healing. At these temperatures the immune system is at its best, and when used in conjunction with salt, it will greatly promote the ability of the fish to heal itself. In my opinion, heat is one of the most overlooked aspects of fish first aid when it comes to Koi and goldfish.
When keeping fish at these temperatures, you should also have some sort of aeration in the water. This is because warmer water holds less oxygen then colder water, and fish kept in these temperatures will need added oxygen to keep from being stressed. See the article The Science of Water for more details about oxygen.
In the case of Ulcers, however, you should heat the system to 82 degrees, as this is the temperature the that specific ulcer causing bacteria will be killed. This assuming a quarantine tank situation as this is not feasible in an outside pond.
Other Treatments (Besides Salt)
Ok in this section we will list in detail the primary treatments we utilize here at the farm above and beyond salt. I cannot stress enough the importance of knowing your exact gallons to be treated. If you measured the pond and used a formula to calculate volume, you will most likely be 25% to 50% off! For this reason I would highly suggest you use the salt method to calculate the volume more accurately. If you don’t you are in danger of over or under dosing the treatments and you could kill the fish or the treatments will fail due to under dosing. You can find out exactly how to accurately figure volume using salt in the beginning of this article.
You should know as well that many treatments are temperature sensitive and are most effective above 50 DF water temperatures. You need to keep this in mind as many times we are treating in the Spring and Fall of the year as this is when many pathogen problems show themselves in the fish. Because of the changing temps during these times of year the fish’s immune systems are not at their best. The colder the water gets, the lower their immune systems get and thus the easier it is for them to fall prey to the attacking bugs and illnesses. The Fall of the year is especially tricky; when water temperatures are dropping. It is critical to watch your fish closely for symptoms. If symptoms do appear you need to treat the fish before the water gets too cold for the treatments to be effective. Winter is hard enough on the fish normally so if they go into winter stressed or full of bugs they will surely succumb the added stress.
In Spring the water temps are rising so you usually have time to wait until they are warm enough to treat more effectively. Salt will help in the cooler temps and you can usually do salt treatments to get you by until the water is warm enough to treat with these other treatments.
In the beginning of this section I will give you the individual treatments, recommended doses, and what each treatments is used for. At the end of this section however I will give you the “shotgun” treatments”. Shotgun treatments are simply a combination of treatments used to cover a full spectrum of the most common bugs. They are primarily used when no microscopy is done and you don’t truly know what is attacking the fish.
The shotgun method is what most hobbyist are forced to do and therefore the most common method of treating when salt fails to do the job.
If salt fails to fix your ailing fish and you do not have the knowledge or the availability of a microscope I would highly recommend you use one of the shotgun treatments outlined below. I would never only treat for one type of pathogen even if i knew what it was. if you are going to treat because the salt failed, make sure to cover all the common bugs that affect the fish. This can be accomplished simply and safely utilizing one of these shotgun treatments
It is also recommended to keep pets and children away from the pond during treatment, and this holds true with any treatments above salt. As well and for safety it would be wise to wear latex gloves, safety glasses and a simple mask that covers your mouth and nose. It is not good to ingest any of these chemicals or get them on your skin.
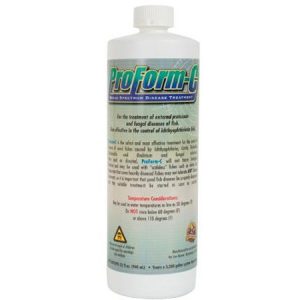
ProForm C (brand name for mixture of Formalin & Malachite Green)
(Treats protozoan Parasites & fungal Infection)
ProForm C is a 22% Formalin with malachite green (F&MG for short) solution that is very mild comparatively. This is usually the one I recommend to beginners for protozoan parasites and fungal infections. Don’t misunderstand though as this treatment is very effective most times. Due to its mildness, there is far less danger of overdosing and killing your fish as compared with some of the other treatments. We primarily use it here at the farm for mild parasitic infestations and/or mild fungal infections. We will also pick this one when the slime coat integrity is not good or minimal, and/or when the fish must be treated immediately. This is the case when there is a heavy infestation and there is no time to wait for the fish to rebuild a better slime coat. In other words, there are times that fish can have a heavy infestation of bugs that put them in danger, yet their slime coats are minimal and they could be in danger of a bad reaction to other treatments. Normally I would like to give the fish some time to rebuild their slime coats, but in cases of heavy infestations of bugs, I may not have that time and need to treat the bugs to at least lower their numbers. In these cases as well, I will sometimes only utilize half-doses of ProForm C just to get the fish out of danger of the bugs killing them. So, you can see this is a case of choosing the better of two evils. If I don’t treat the fish ASAP, the bugs may kill the fish, but if I do treat them the treatment may irritate or even burn the fish with no slime layer to protect them. This is a judgment call that must be made at times. This is rare and most times we do salt first and it will do this job of rebuilding slime and slowing the bugs.
As far as dosing and treatment protocol, simply follow the directions on the bottle. I normally utilize the standard dosing of 10ml per 100 gallons of water, and the suggested three treatments over three days per the directions. In the case of the beginner using this treatment, you must be aware that it is mild and can sometimes fail or not get a good enough kill rate of the bugs. There are many reasons this can happen. For example, the directions will tell you to do water changes before and in between treatments. Many people assume the primary reason for this is to be assured that there is no residual chemical left in the water from the previous treatment. This is not the case. The main reason to do these water changes is to reduce the organic load in the water. Lots of dirt and muck will absorb the medication before it reaches the fish, and therefore will be less effective. So the cleaner the pond is, the better the success rate of the treatments. Basically put, I would simply suggest you follow the directions on the bottle and see if the fish get better and/or the symptoms persist or not. It has been my experience that this standard dose will be sufficient for mild infestations about 75% of the time, all things considered. If the symptoms do persist, however, you may have to try a fourth and heavier dose then recommended on the bottle. I have found that a dose and one half (ie 1 1/2 the labeled dose) will usually work if the standard dose does not. DO NOT ATTEMPT THIS DOSE UNLESS YOU ARE 100% SURE OF THE GALLONS YOU ARE TREATING!
For example, the recommended dose is 10ml per 100 gallons of water, so a dose and one half would be 15ml per 100 gallons of water. This does not mean, however, that it is always better do the heavier dose as opposed to the recommended one. The standard dose will not normally hurt your biological filter, but the dose and one half may set it back some. No matter the dose, always check the ammonia and nitrite levels daily. I will say however, that a dose and one half of ProForm C is very close to the same mixture as many other F&MG which are 37% formalin.
You can use the Proform C Dosing Calculator to determine how much Proform C to use for a sinlge labeled dose and 1 1/2 the labeled dose
NOTE:
Some folks, as well as the maker of ProForm C and other brands of formalin and malachite green mixtures, say not to use their product in combination with salt in the water. Some like the makers of ProForm C recommend salt be no higher than .05%. However, I have used salt at higher levels up to .6% quite routinely with no ill effects ever. I have treated literally billions of fish this way. I have also done many experiments on this same subject and have NEVER been able to produce this “bad reaction” as reported by some, and even with salt levels as high as .8%. It is my personal opinion that these reactions are caused by other factors such as treating fish with poor slime coat integrity, and/or human error such as overdosing the treatments.
There is simply no scientific, chemical reaction or any other reason that salt cannot be used with formalin and malachite greens solutions.
The primary reason I mention all of this is because many times hobbyist have to utilize salt to find out how many gallons their ponds truly are. I recommend using salt to do this, as mentioned previously in this article. Anyway, some folks can’t do water exchanges readily for various reasons of limited water supplies and such, and they are forced to leave the salt in the water after using to calculate their gallons.
Here at the farm we use the salt to rebuild slime coat after pulling the fish from the muddy waters of the ponds. The muddy water is like liquid sandpaper: it really does a number on the slime coats. We also use it to calm the fish as mentioned earlier. The low salt concentrations help the fish rebuild their slime coats and help lower their stress levels. Here at the farm as well, we would have to use way more water than needed, to always have to dilute the salt out prior to F&MG treatments, and even my water supply is somewhat limited. That is all I will say about that. So you can decide for yourself whether or not to dilute it out first or not, but personally I would not.
It is also recommended to keep pets and children away from the pond during treatment, and this holds true with any treatments above salt. For safety purposes, it would be wise to wear latex gloves, safety glasses and a simple mask that covers your mouth and nose. It is not good to ingest any of these chemicals or get them on your skin.
Potassium Permanganate (AKA-PP for short)
(Treats Protozoan parasites, fungal infections & bacterial infections, slows flukes cleans organic buildup from system )
All things considered, this is my preferred treatment for protozoan parasites. It also works well for certain bacterial infections. It is quick to work at the proper dosage, and at the same time it helps clean the entire system and lower the organic load in the water. Before you get too excited, however, let me also say that it can be dangerous in inexperienced hands if not applied properly, and has killed many a pond full of fish when used incorrectly. You cannot simply add this to the system and walk away. It must be monitored throughout the duration of the treatment for reasons in which you will soon learn. Also realize that PP will kill your biological filters if you allow the treatment to go through them. For this reason you should bypass the filtration or turn it off during treatments. I will not use PP on fish that have little to no slime coats, as it can easily do more harm than good. When this is the case, I would wait until they build a better slime layer in a few days or as long as I can wait. Sometimes, however, there is no time to wait to treat fish because the bugs are killing them quickly, and therefore an immediate treatment is warranted. In this case, I would simply use salt or at most ProForm C instead in these cases of minimal slime coat.
As you will see, I will spend a lot of time discussing PP. I am not trying to scare you away from its use, but I am demanding that you respect this treatment. Chemically it is labeled as KMn04, but in the industry we commonly refer to it simply as “PP”. So to keep it simply we shall do the same here.
PP is most commonly used to clean greensand iron filters in water supplies. Many people throughout the world have these filters in their homes to extract iron from their drinking water. Every so often, these filters need to be cleaned or regenerated. This is usually done with PP, as it is a powerful oxidizer. Since PP is such a good oxidizer of any organic material, it will do a very good job in removing them from the system. It has also been used as a dye, and you will see why if you ever use it. It can be quite difficult if not impossible to remove the stains it can cause on clothing and skin. It comes in four primary grades or purities, but this is not very relevant to us, as only a few types are readily available to the average person. Since the dosing rate is the same for all of those primarily, we won’t go into any further detail. To be safe, purchase it from an aquaculture supplier or Koi supply dealer.
As stated earlier, we use it to treat for protozoan parasites and bacterial infections, but also occasionally simply to reduce the organic and bacterial loads of our systems. The less the organic load, the less of an anaerobic/” bad” bacteria count in the water/system, and therefore the better for the fish overall. Anaerobic bacteria are bacteria that live in low oxygen environments in your pond such as in the muck in the filters and on the bottom in any muck that accumulates there. These types of bacteria are those that hurt our fish, or carry other pathogens that hurt out fish. This is another reason it is important to keep everything as clean and free of organics as possible. Some hobbyists, and even I at times, use PP routinely to help clean the pond and lower the organic loads. By doing so, you can keep these anaerobic conditions to a minimum. A low organic load is one of the most important factors in having healthy water and fish. It is probably the number one thing to be concerned with in water quality and fish health, and especially when speaking of bacterial issues.
PP tends to polish the water after treating, and you can even see the difference in clarity, and actually smell the difference as well. The reason for this is that it oxidizes all the microscopic organic particles in the water, and thus leaves it looking cleaner and crystal clear. Also as muck/organics accumulate, they create hydrogen sulfide to be expelled as the muck breaks down. This makes the water smell off. This is why after a treatment with PP you can even smell the difference, as it clears the muck and thus the hydrogen sulfide. I will say, however, that this practice of using it to routinely clean the system is frowned upon by some. Even I, to a degree, believe that proper filtration systems should be able to do this on their own and without these chemical treatments. In reality though, not everyone has good enough filtration systems to keep the organic loads as low as they should be, so IMHO: it is fine to use PP in these cases maybe once, twice or three times a year. Of course, routine cleaning of the system like vacuuming the bottom, cleaning the filters etc., would have to be done as well. We will discuss the details of dosing and such for this type of application later in this writing.
Since PP comes in the form of a crystalline powder or flake, it is always weighed for dosing as opposed to measured by volume. These weights will be in grams for the purpose of this writing, so you will need an accurate gram scale to weigh it. The traditional beam/balance type scale works fine for this, but today there are also some very accurate, yet inexpensive electronic gram scales on the market. No matter the scale you use, just make sure it is accurate. PP is one chemical you do not want to overdose. In discussing a possible overdose, PP can be neutralized and deemed inactive with simple hydrogen peroxide. What this means, is if you add about ½ cup of peroxide to the system after any PP treatment (be it an overdose or not) it will deactivate the PP. So as you can see it is important to have the needed amount of peroxide on hand in the case of any possible problems, bad reactions, or overdoses. Simply add the peroxide and you will see the color change before your eyes and the water becomes clearer. You can also use the peroxide at the end of any treatments if you want to make certain that the PP is made inactive after the time frame you desire. Also, certain ammonia binders also deactivate PP as well. I do not recommend their use for this purpose however. The reason I mention it is because you cannot have any active ammonia binding agents in the system when attempting to treat with PP. If you did, the PP would be rendered inactive immediately, and you would not be able to maintain the proper color (ie concentration of PP). We will discuss the color issue shortly and you will then understand why it is mentioned here.


As for dosing, we usually do this based on the PPM (parts per million) that will end up in the water initially. I say initially, because as soon as it mixes in the water it begins oxidizing anything organic in the water, and thus the active PPM reduces proportionately. I say active because the PPM you start with goes down proportionately as stated, and thus this leaves us with less and less active PPM. We will discuss this in detail shortly.
These organics I refer to include algae, fish waste, dead leaves, insects etc. As PP oxidizes these organics, it is expending itself proportionally as well. So what this means is that the more organics in the pond/system, the quicker the PP will get spent, and its killing/oxidizing power will decrease more rapidly. What this now means to us when treating fish for parasites is that the more energy it uses to oxidize these organics the less it has left to get to and kill the targeted parasite. Now this translates into the basic fact that the dirtier the pond or system, the less effective it will be at killing the parasites/pathogens. This also means that you will most likely need multiple and consecutive treatments to do the job. The initial treatments will be expended quickly in cleaning/oxidizing the organics and each consecutive dose will therefore be a little more effective at getting to the parasites, as well as last a little longer each time. So with all this in mind, we need a way to figure out its effective strength or active PPM for the duration of each treatment. There are two basic ways to do this. One way is with the use of an ORP meter (Oxidation Reduction Potential Meter), and the other is simply by monitoring the color of the water after the application of the PP. For the purpose of this writing, we will solely discuss how to do this based on the color of the water, as this is much more practical for the average person. Use of an ORP meter is a little more advanced, and we will discuss this in another writing.
PP can be dosed from 1 PPM to 6 PPM for treating fish generally, but here at the farm we use three primary doses for three specific reasons. These are 1 to 2PPM for routine cleaning of systems and filters, and 3PPM to 6PPm for treating parasites. I very seldom use doses higher than 4PPM however, and I would highly suggest the average hobbyist never use any higher than 4 PPM doses for treating parasites. I would even suggest you stick with no higher than 2 or 3 PPM treatments until you get some experience with it.
Now, to figure out how much PP we need by weight to achieve a given PPM is not difficult. One way is to go to click2roark.com. This is a website by hosted by one of the greats in the Koi treatment world. In real life he is a lawyer, yet he also has an extensive knowledge of chemistry, and Koi health in general. He is also a very funny guy whom I respect immensely. On his website he has some very good chemical calculators where you simply input the gallons to be treated, the desired PPM, and it will give you the exact dosage you need. As well, it will give you these doses in many forms of measurement, such as grams, pounds, ounces, etc. It is a very handy tool, and I can’t say enough good things about these calculators.
The other way to figure the dosing is fairly simple, however, and anyone can do it. How it is done is once you know the gallons you are treating, we need to convert that to tons of water as opposed to gallons. There are 264 US gallons to every ton of water. So, this would mean you would need to divide your total gallons to be treated by 264. The answer to this is the tons of water you are dealing with. Now knowing this, you achieve one PPM by adding one gram of PP (or whatever) to one tone of water. Let’s say that again. One gram of PP (or any treatment chemical in dry form) in one ton of water gives you one PPM solution. Another way of putting it is you add one gram of PP to every 264 gallons of water (one ton) to achieve a one PPM solution. So, you simply multiply the tons of water by the desired PPM you want to achieve, and the answer will be the grams of PP to put in. As an example, let’s say we have a 1000 gallon system we want to treat with a 3 PPM dose of PP. Simply divide 1000 by 264 to get the tons of water. That answer would be 3.78 tons of water. In other words 1000 gallons of water is equal to 3.78 tons of water. Now you would simply multiply the tons of water by the desired PPM of PP you want to achieve. That would be 3.78 (tons of water) times 3PPM and the answer would be 11.36 grams of PP. So you would need to add 11.36 grams of PP to 1000 gallons of water to achieve a 3PPM dose rate or solution.
Once you know how much PP you will be adding in grams, you simply weigh it out, and add that to a five gallon bucket of clean water and mix it thoroughly. You should wear safety glasses and appropriate protective clothing as well. You don’t want this stuff in your eyes or to stain you clothes. Then you would simply pour the solution evenly around the system. I stress evenly because you do not want the full strength solution (before it mixes) to hit the fish directly. In other words, once you start adding the solution to the system, you will see this dark purple cloud going into the water. Try to avoid as best as is possible this cloud hitting the fish in full strength. The reason is that before it mixes with the entire volume of the water, that cloud is a much stronger PPM until it mixes, so pour it in slowly and evenly throughout the entire system.
Now remember how we discussed active PP or active PPM? Assuming we are not using an ORP meter, you can simply monitor the color of the PP once it is added to the system, and thus have an idea if the PP is still in an active state and doing its job. This is the most critical aspect in this treatment, as the PP needs to be in an active state for at least four to eight hours to work affectively in killing most protozoan parasites. I personally like to see it active for at least six hours in most cases. As stated PP will be dark purple when first added and mixed into the system , but as it gets spent and becomes less active, it will turn from purple to pink, then to orange or yellow to brown. Once it is brown, it is completely spent. I consider PP only active when it is purple or pink only. Any other color and it is less likely to be working any longer. So, the time frame of six hours of active PP I prefer means the PP solution once added to the system must be purple or pink for those six hours.
Now knowing this you have to understand that as soon as you add the solution to the pond or system, it immediately goes to work in oxidizing any organic in the pond a stated earlier. So, the more organics in the system, the faster the PP will be rendered inactive and turn to orange/yellow or brown. In many cases of the first PP treatments in ponds for example, can go to brown and become inactive within a very short period due to the organics in the pond, sometimes as quickly as fifteen minutes or so. How dirty the system totally dictates the amount of time it will stay active (pink or purple). In a clean quarantine tank for example, the PP may stay active for the whole duration you are trying to achieve because there is little to no organics in that system for the PP to oxidize.
Again as stated earlier, when you first add PP to the system at whatever dose or PPM, the water will turn dark purple in color. The higher the PPM dose, the darker purple the water turns. Once PP becomes less active, or there is less of an active PPM solution, the color will change from dark purple, to pinkish, to orange, and then to brown accordingly. Again we need it purple or pink for four to six hours for this treatment to work properly. So, let’s say you add whatever dose you choose, and the water goes to brown in less time than the 4 to 8 hours. You can add another dose to the system, but at a lower PPM of no more than 1 or 2 PPM to bring the PP and/or color back to an active state. Any re-doses should always be at least 1 PPm lower than the initial treatment dose. Forgive me being so repetitive about this, but as this is the most critical step in PP treatments, I want to make sure you are clear.
As an example, let’s say you decide to treat your fish in a 1000 gallon pond with PP at the rate of 3PPM dosage, and you want that dosage active for six hours. After you add the initial dose of 11.36 gram solution to the pond (3 PPM), it turns outside of the pink or purple range and into the orange, yellow or brown range in 15 minutes. At this point, I would mix another solution of only 2PPm. In a thousand gallon pond this would be another 7.58 gram addition to the pond. This would be considered a re-dose for the sake of this example. Now let’s say that after that re-dose the water stays purple for another 2 hours. So far, the solution had been active (pink or purple) for 2 hours and fifteen minutes. Now you would need another re-dose of 2PPM to get to your target time of six hours total active state. So, you add another re-dose of 2PPM and the water says pink or purple for another 31/2 hours. You have now reached your total of six hours in the active state, and you are done for that day. You can do up to 3 re-doses (in addition to the initial treatment of 3PPM) in a one day treatment. This would make a total of four doses; one at the initial 3PPM, then three more re-doses at 2PPM or less if required. I say “or less” because sometimes if it requires three re-doses to maintain the pink or purple for the six hours, I may do the first re-dose at 2PPM and the following two at only 1PPM. Again, depending on how much of an organic load there was, would dictate how many if any re-doses may be required and at what strength.
Now this initial treatment of PP (including the re-doses) would be considered the first treatment, and should be all in the same day. So when treating with PP as you can see you will need to monitor it throughout the day. This means you need to do this on a day that you can spend this amount of time monitoring the treatment. Normally, two daily treatments over two days will do the job for parasites. However, I occasionally have done three treatments over three days. The use of a microscope is best here, because you then can see if the treatment/treatments did the job or not, and if any further treatments are warranted. Again, two consecutive treatments over two days with the solution active for six hours of each treatment will normally suffice. Now after the first treatment regimen of the first day, the water may be a little dirty looking. Do not worry about this. However, after you are completely done treating with PP, be it after one, two or three daily treatments, I would add ½ cup of hydrogen peroxide per 1000 gallons of water to the system. Only add the peroxide after your final daily treatment. If you were to add it between treatments, the residual peroxide would stay in the system for 72 hours. If this were the case, you would not be able to do another PP treatment until after that amount of time or the PP would be rendered inactive immediately due to the residual peroxide in the system.
Other Important PP Considerations
Other things to note when using PP are how the fish are acting during treatments. As PP oxidizes in the system, it is also using oxygen in that system. Therefore it is very important to have plenty of aeration during each treatment. This becomes even more critical the warmer the water gets. Warmer water especially above 80 degrees F holds less oxygen to begin with, so added aeration becomes almost mandatory at these temperatures. In addition, at the higher levels of PP like 3 or 4 PPM doses, this can slightly affect the fishes’ gills as well. This in turn can slightly hamper their efforts to get the oxygen from the water efficiently. So, there could be plenty of 02 in the system but they may struggle slightly getting it. You can tell when this is happening if you see the fish hanging at the surface or hanging near water intakes and places with higher 02 counts. This does not always constitute an emergency however. If you see the fish doing this, and especially if it is near the end of their treatments, simply approach them and/or wave your hand over the water. If the fish react and swim down away from the surface they are OK. If they do not react, then you should consider deactivating the treatment with the peroxide immediately. Many times when I use the 4PPM dose rate here at the farm, the fish will exhibit this behavior after about three to four hours in an active treatment. I simply do the reaction test periodically to make sure they are still OK. As well, if I do see this reaction and the fish have been in treatment for at least four hours, I end the treatments for that day, and not do any re-doses even if they did not make the entire four hours in active treatment I prefer. Let them rest and do it again the next day or the day after that. You have to use your judgment as to the dose, the time frame in active treatments, as well as how many treatments to do and whether they be consecutively or not. In other words, if fish give you this reaction of surfacing on the first day, you may want to only do treatments every other day. One other consideration in all of this is that many times the parasites themselves have caused some gill damage prior to the treatments. In these cases the fish may not be able to stay in the treatments as long, and you will get this reaction more often. This is easily determined by the methods I have described as well. Simply use your best judgment and watch the fish for signs of distress. It is quite common to see some flashing during treatments as well, so I would not worry about that reaction as much, if at all. Now if they are flashing crazily, and/or jumping as well, you should be concerned. This could be a possible overdose, and you may need to consider deactivation of the treatment.
This all sounds way scarier than it really is. Don’t let this intimidate you away from using PP. As long as you know the exact gallons you are treating, and you weigh the PP accurately on a gram scale, as well as use common sense, you should have nothing to worry about at all. No matter, if you make sure you have enough peroxide on hand at the time of treatment; you can always put it in and deactivate the treatment at anytime.
See the Pond Volume Calculator above to calculate your pond’s exact gallons
It is also recommended to keep pets and children away from the pond during treatment, and this holds true with any treatments above salt. As well and for safety it would be wise to wear latex gloves, safety glasses and a simple mask that covers your mouth and nose. It is not good to ingest any of these chemicals or get them on your skin.
Tremetodes/Flukes and/or Internal Worms

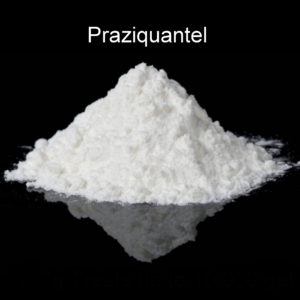
Praziquantel (AKA- Prazi for short)
(Treats Skin & Gill Flukes, and intestinal worms)
Normal Dosing is 1 gram Prazi for every 100 gallons of water- occasionally 2 grams per 100 gallon for bad fluke infestations in certain water temperatures left in for 7 days)
Prazi is a very gentle treatment and can safely be used by even a novice. There is not a tremendous worry about a reasonable overdose, but as with anything you add to the pond you still need to know your true gallons you are treating.
A few things I don’t like about Prazi ;
It is not water soluble so it needs to be mixed with something to get it to breakdown and actually get mixed into the system. I usually use a single dose of ProForm C for this. We will discuss this in the “Shotgun Treatments below.
It is expensive, but considering the cost of Koi, it’s worth it.
It takes seven full days to treat the fish for flukes. This is a little slow for my liking as a commercial Koi operation. It is also slow for heavy infestations of flukes that could do serious damage in that time frame, before they are eradicated.
As stated about it is dosed normally at 1 gram Prazi for every 100 gallons to be treated. For example if you had a 1500 gallon system to treat you would need 15 grams of Prazi. You need to leave this in the system without adding or changing any water for 7 days for the Prazi to be effective. You must also take note of the water temperature that you are treating. No matter the type of fluke, skin or gill fluke, they all are carrying offspring inside either in the form of eggs or live offspring. The warmer the water is the faster the offspring hatch from the eggs or the parent.
Water temperature matters because the offspring will hatch sooner in warm water as compared to cold. (You can read more details of this in the Koi Parasite ID section.) Basically put: if the offspring don’t hatch within the 7 days of the treatment they can still be born and affect you fish. Either the eggs will hatch or the live-born babies will even hatch from the dead fluke parent! What this means if you are treating in colder water you will most likely need to do two consecutive Prazi treatments to be sure to kill the offspring that hatched or are born from the dead parent. In general if you are treating for flukes in water temps less than 65 degrees F, you will need to do two consecutive treatments of Prazi to be assured you are killing the offspring.
The Prazi Treatment Protocol
As stated I quite often use ProForm C to help get the Prazi to be water soluble. As a matter of fact in most cases here at the farm we regularly use a combination or “shotgun treatment” (we’ll discuss this later) of ProForm C dosed each day for three days. However on the last or third dose of ProForm C I mix the Prazi with it in a small jar and shake it vigorously. The ProForm C easily breaks down the Prazi and makes it more water soluble. I then mix that solution in a five gallon bucket of water and distribute it evenly throughout the system I am treating. I leave this in the system for seven days. At the end of the seven days we do a 25% to 50% water change but this is not a must. Many folks can’t easily do these large water changes in their ponds due to the sheer volume.
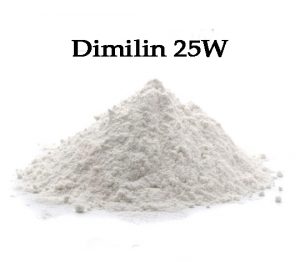
HKF Fish Lice & Anchor Worm Treatment
(AKA Dimilin 25)
Treats fish lice and anchor worms
Normal dose is 1 ppm or 1 gram per ton or 264 gallons of water. (1 ppm dosage)
We use this treatment exclusively here at the farm to treat fish lice and anchor worms. Both fish lice and anchor worms are consider crustacean type parasites. As they grow they must slough their out hard shells to allow for growth. This treatment disrupts this cycle and thus kills the critters. As well each one of these bugs has multiple stages of life. As adults you can see them on the fish with the naked eye. They can be different colors as well. The lice look similar to ticks in appearance and size. The anchor worm is not a worm at all and as an adult they look like white to off white splinters sticking out from the fishes bodies or fins.
As stated above we use a 1ppm dose rate. We mix it in a bucket of water and evenly distribute through the system. We live this in for 4 full days to get the most effective kill rate for anchor worms and fish lice. Occasionally fish lice require 2 or more treatments to completely eradicate. After each treatment we do a 50% water change and I would suggest you do the same in your system or pond.
I you have to do more than one treatment I would space treatments at least 4 days apart.
Dylox 80 (KOI & Goldfish ONLY…not for use Golden Orfe)
Treats flukes, anchor worms, fish lice and slows trichodina)
3ppm active ingredient or 4 ppm out of the bag (details below)
Dylox 80 is normally used as a pesticide in farming and horticulture to kill insects. However it is now approved for use in ornamental fish species like Koi. We have done extensive testing with it over the years and find it to work well for flukes, anchor worms and fish lice in Koi.
This is a serious chemical and an organophosphate so you do not want to ingest, inhale or get it on your skin or in your eyes. Normally this is not a big issue as the dosages are so small when treating our systems of Koi.
Dosing Dylox 80
As for dosing there are two methods as listed in the heading. One is dosing based on only the amount of active ingredient of the product. For example Dylox 80 is only 80% active ingredient and is listed like this (ACTIVE INGREDIENT: Dimethyl (2,2,2-trichloro-1-hydroxyethyl) phosphonate ……………….80
So in the case of Dosing Dylox 80 you would use the following formula shown using an example pond volume of 37,400 gallons using .25 ppm of active ingredient.
Dylox to be added = gallons of system/pond × 0.0012 g/gallon so this would be
37,400 gal × 0.0012 g/gallon = 44.88 g Dylox® 80 needed to treat the system
The other method is much more simple for those of you that are math challenged. With this method you are not looking at the active ingredient but the whole product right out of the container which includes the other 20% of inert ingredients. However this dosing I am giving will only apply to Dylox 80 which is 80% Dylox so to speak. If you had any other concentration it will not work.
The dose rate we use at the farm is 4 PPM out of the container. To achieve this you simply covert the gallons in the system to tons of water. One ton of water is 264 gallons. So you need to use that to determine how many tons your system is. Simply divide the gallons by 264 and this answer is the number of tons.
As an example if your pond is 4000 gallons, simply divide 4000 by 264. The answer here is 15.151 (fifteen point one five one) . Since it is so close just round down and call it 15 tons of water to be treated.
Now you need to know that 1 gram of Dylox in 1 ton of water gives you a 1 ppm dosage.
We know we are treating 15 tons and we know to get a 1 ppm dose for that it would be 15 grams. (15 tons x 1 gram per ton is 15 grams or 1 ppm solution. Since we want to achieve a 4 ppm dose rate simply multiply 15 times 4 and you get the total dosing of 60 grams of Dylox 80 to dose 4000 gallons at 4 ppm.
Once we have the proper dosage we simply mix this in a bucket of water and distribute throughout the system evenly. This stays in for two full days and then we do a 50% water change. Even in larger system I would do this water change so if you are not prepared to do this than do not use Dylox 80.
You must also be careful in treating smaller fish. I would not use this treatment for fish less than 4″ as it can be toxic to the really small fry or fingerlings at this dose rate. It is also recommended to keep pets and children away from the pond during treatment, and this holds true with any treatments above salt.
It is also recommended to keep pets and children away from the pond during treatment, and this holds true with any treatments above salt. As well and for safety it would be wise to wear latex gloves, safety glasses and a simple mask that covers your mouth and nose. It is not good to ingest any of these chemicals or get them on your skin.
Shotgun Treatments
Remember: a Shotgun Treatments is simply a combination of treatments used to cover the full spectrum of the most common bugs.
Shotgun Treatment #1
You will need ProForm C, Praziquantel, and Dimilin 25 all available in our online store under Medications
Treats Protozoan parasites, Tremetodes and nematodes, fungal infections, fish lice and anchor worms
Again let me stress that you MUST know for sure the exact gallons you are treating before attempting this treatment!
On the first day you will dose ProForm C exactly in accordance with the label directions. Turn off UV lights as they may interfere with the treatments. Leave this treatment in for 24 hours. There is no need to bypass filtration as this treatment will not harm your biofilter.
After 24 hours do a 25% water exchange if possible. This is not mandatory as the label suggests but it is preferable if possible. Then proceed to do a second dose of ProForm C exactly the same manner as the first one. Leave this dose in for another 24 hours. again if possible do another 25% water change.
After the second dose has been in for 24 hours you should be on the third day of treatments. On this third treatment you will also do a single dose of ProForm C in accordance with the label directions, only this time you will mix Prazi with that ProForm C. The best way to do this is put the dose of ProForm C in a jar or something with a leak proof lid.
At this point you will be adding a single dose of Prazi to that jar. Prazi is dosed at 1 gram per 100 gallons of water to be treated. See Prazi directions above for details. Take the dose of Prazi and add it to the container with the ProForm C dose, put the lid on and shake vigorously until well mixed.
Then take this mixture and add it to a 5 gallon bucket of water and mix well. Now evenly distribute this 5 gallons into the system being treated. Leave this treatment in for a full seven days with no water changes during that time. Also try to avoid treating an outside pond if they are calling for any heavy rains in those 7 days as this may dilute the treatment.
Once the seven days is up, from that day wait 4 more days and do a treatment of Dimilin 25 at a dose rate of 1 PPM or 1 gram of Dimilin for every 264 gallons you are treating. Leave this in the system for another 4 days and you are done with all the treatments. If possible do a 25% water change. This is recommended but not mandatory.
Hopefully, the fish should be showing signs of improvement. I would give them a good week to shows these signs. If they don’t you could repeat this entire treatment protocol again in a few days minus the Dimilin 25. When I say entire treatment protocol I mean the three daily doses of ProForm C with the last dose being mixed with the Prazi. Again leave the last dose for seven days. There is no need to repeat the Dimilin treatment as in most cases you would have seen these critters on the fish if they were still present. One treatment of Dimilin 25 is usually sufficient to kill the microscopic stages of fish lice and anchor worms so there is no need to repeat a second time.
Shotgun Treatment #2
You will need ProForm C, and Dylox 80 both available in our online store under Medications
Treats Protozoan parasites, Tremetodes and nematodes, fungal infections, fish lice and anchor worms
Again let me stress that you MUST know for sure the exact gallons you are treating before attempting this treatment!
This shotgun treatment treats all the same pathogens as Shotgun treatment #1 but it utilizes only two treatment medications of ProForm C and Dylox 80.Understand however that Dylox 80 is a little more potent than the Prazi and the Dimilin 25, and Dylox kills flukes, anchor worms and fish lice. It also works a little better on flukes as compared to the Prazi. Because it is more potent it becomes even more critical to be sure of the gallons you are treating because Dylox 80 is also more toxic to fish as compared to Prazi. As long as you are sure of your true volume there is no need for concern in most cases.
For this shotgun treatment you will start on the first day by dosing one dose of ProForm C in accordance with the label directions. Repeat for the next two days for a total of three ProForm C treatments. Again it is not mandatory but suggested to do a 25% water change between each ProForm C treatment.
After the third and final ProForm C treatments do a 25% water change. Then wait a day or two and treat with the Dylox 80 at a dose rate of 4 PPM out of the container.
As an example if your pond is 4000 gallons, simply divide 4000 by 264. The answer here is 15.151 (fifteen point one five one) . Since it is so close just round down and call it 15 tons of water to be treated.
Now you need to know that 1 gram of Dylox in 1 ton of water (264 gallons) gives you a 1 ppm dosage.
We know we are treating 15 tons and we know to get a 1 ppm dose for that it would be15 grams. (15 tons x 1 gram per ton is 15 grams or 1 ppm solution. Since we want to achieve a 4 ppm dose rate simply multiply 15 times 4 and you get the total dosing of 60 grams of Dylox 80 to dose 4000 gallons at 4 ppm.
Once you have dosed the system properly leave this treatment in for a full 48 hours. Then do a 50% water change.
Hopefully the fish should be showing signs of improvement. I would give them a good week to show these signs. If they don’t you could repeat this entire treatment protocol again in a few days minus the Dylox 80. When I say entire treatment protocol I mean the three daily doses of ProForm C only. There is no need to repeat the Dylox 80 treatment as in most cases you would have seen these critters on the fish if they were present. One treatment of Dylox 80 is usually sufficient to kill the microscopic stages of fish lice and anchor worms so there is no need to repeat a second time.
Bacterial Treatments
Neosporin Ointment (not cream)
Treats cuts, ulcers, sores cause by fungus and bacteria, fin and tail rot caused by bacteria.
You can see a detailed tutorial of its use on ulcers in the article on this website entitled Koi Wounds.
Yes I said Neosporin, the same stuff we all use on our cuts and sores. It works every bit as good as any similar ointment sold for fish, but costs much less!
As stated there is a detailed tutorial on this site for its use on wounds (See our Koi Wounds Article), but in reality most often all you need to do is pat the area dry you are treating , rub the Neosporin in vigorously and let the fish go back into the system. This works for any area that you see infection/redness.
It also is used for fish that have lost their slime coats. This can happen when fish jump out of the system they are in and roll and flop all over. It is also good for skin infections in fish. You can see details on skin infections in the Koi Symptom Diagnosis article on this site.
Once you have treated and released the fish, look for any redness to fade. If the redness doesn’t go away you can, and should, repeat this topical treatment. With each repetition however be a little more gentle when applying as not to disturb any areas that are starting to heal. For example ulcers on fish heal from the outside edge and work toward the center of the ulcer. If this is the case you will see a white edge appearing and that is the part that has begun to heal. if the center is still very red just apply the ointment to the center and avoid the edge.
That’s all the is too it!
Oxolinic Acid Bath
This is used on fish with ulcers/sores on their sides and bellies. You need to do this in a separate system from where the fish are normally kept because this treatment will kill your filter otherwise.
The number and size of fish being treated dictates the size of tank you treat them in. Since this stuff is so expensive and the fish are only in the treatment for an hour keep the tanks as small as possible but have plenty of aeration. No filtration is need for this short time, and as a matter of fact if you run this treatment through any biological filter it will kill that filter. So DO NOT EVER run this treatment through any biological filtration. Always remove the fish from any filtered tank and temporarily put them in an unfiltered tank for treating for the one hour treatment.
Then after one hour in treatment you want to rinse the fish off in another small tank of freshwater BEFORE returning them to the filtered system. This is to make sure no treatment water gets into the filtered system where the fish normally live.
Treatment Dosage and Mixing
Oxolinic acid comes in powder form. The dose rate is 25 ppm (parts per million) and the fish are to be put in this solution for one hour only. They should not show any signs of distress at all during this one hour treatment. If they do you did something incorrectly most likely so take the fish out immediately. In the correct treatment and one hour time frame they shouldneve3r show any signs of distress unless they were already so weak going into the treatment. If this is the case you may lose any weak fish during a normal treatment.
You must know the exact gallons of the treatment system, so it is critical to be sure of the volume of water you are treating for accurate and safe results.
To achieve 25 ppm dosage you add 25 grams of oxolinic acid for every 264 gallons of water to be treated. If you have more or less total water than 264 gallons you need to adjust the dosage accordingly.
For example to achieve a 25ppm dose rate in only 100 gallons of treatment water, you would only add 9.46 (nine point four six) grams of oxolinic acid to achieve a 25ppm dose rate.
Below is an easy reference chart for different ways to achieve a 25 ppm dose rate in various gallons of water/sizes of treatment tanks.
Oxolinic Acid Dose Rates
Treatment Tank size Total Grams of Oxolinic Acid
in Gallons Needed
5 Gal .473 gr (point 47 grams)
10 Gal .946 gr (point946)
25 Gal 2.366 gr (2point 366 )
50 Gal 4.731 gr (4point 731)
100 Gal 9.46 gr (9 point 46 )
1000 Gal 94.265 gr (94point 265)
Mix very well the total grams needed in a 5 gallon bucket of clean water and evenly distribute in treatment tank. Make sure to have plenty of aeration in the treatment tank, and leave the fish in the treatment for one hour only.
If the fish do not improve in a week or so you can repeat the treatment. Topical treatment of Neosporin or iodine on any open sores will greatly improve healing.
- written by John N Fornaro
- Hanover Koi Farms All Rights Reserved
”Reward”
(Diquat 37% active ingredient)
Reward is a brand name for a herbicide that is 37% Diquat as the primary active ingredient. It is used to treat columnaris flexibacter infections in Koi. Columnaris bacterial infections in Koi are primarily caused by crowded fish, and /or dirty, high organic systems. It is always present in all water and/or on the fish themselves. It is when the bacterial count gets out of hand, and/ or the system gets dirty or overcrowded that it attacks Koi.
Columnaris bacterial infections are also known as “Cotton wool disease” because it sometimes appears as white, off-white or green or brown tufts of fuzz on the fish. It can look very similar to another Koi ailment called Saprolegnia (Sap for short) which is a fungus and not a bacterial infection. Only observation under a microscope can they be accurately distinguished from one another. However quite often Sap will show up as a white, off white, green or brown tufts located on the body and fins, and there is no mouth rot. So Mouth rot is one sure sign you are dealing with Columnaris bacteria and not Sap fungus if you don’t have a microscope to verify the problem. Also the fuzz of Sap fungus on the body will eventually eat through the layers of skin on the fish’s body and ulcers or sores will be caused by this fungus eating through the skin. In the case of Sap, you can simply wipe off the fuzz and treat the infected area with iodine and/or Neosporin on the infected area only. Sap is treated differently using a mixture of Formalin and malachite Green and not the subject of this article.
Columnaris infections are also known as “saddle back disease”. This is because Koi will get ulcers/sores just under the dorsal fins on the back of the fish, and these sores resemble a “saddle” on the fishes back. These sores just under the dorsal fin on the back of the fish are a good clue you are dealing with Columnaris bacteria and not Sap fungus. Sap usually only occurs on the sides and fins of the fish, and does not cause the “saddle back” sores like Columnaris.
It is also known as “mouth or fin rot”, as this bacterial infection will literally cause the mouths and fins of the fish to slowly get eaten away and infected.
So the primary signs of a Columnaris bacterial infection are a single or a combination of the above described symptoms of mouth rot, fin rot, or sores on the fish’s back under the dorsal fin, as well as cottony looking tufts of fuzz that may appear anywhere on the body of the fish, but especially under the dorsal fin. When these systems appear it is a good chance that it is a Columnaris bacterial infection involved, and it is time to treat.
The first thing I would try is to slowly raise the salinity of the system to a .5% (point 5 percent) salinity, and leave the fish in that for a week or two. This will also help if you mistake Columnaris for Sap, as salt will help treat Sap. If no improvement comes in a week or two, and you feel it is Columnaris by symptoms, it is time to treat with “Reward” /Diquat 37%).
“Reward” Dosing and Treatment Protocol
This protocol and dosing is only for “Reward” with 37% Diquat as the active ingredient. Other dilutions of Diquat will require a different dosing.
For every 100 gallons of water to be treated add 4.3 cc also known as mg/l (milligrams per liter) of “Reward” as purchased 37% Diquat. Make sure to shake the bottle of Reward very well. Once shaken well, add the proper dosage to a 5 gallon bucket of clean water and mix well. Then evenly distribute this 5 gallons of solution thru the system to be treated. The fish can be left in this treatment indefinitely, but keep a close eye on your water quality during this time, as it may or may not affect your biofiltration. So basically put make sure to test the ammonia, and nitrite each day the fish are in this treatment to verify if it is affecting biofiltration or not. It has been my experience that sometimes it does, and sometimes it does not affect biofiltration. To date I have not found out exactly why this is.
If you do experience ammonia spikes DO NOT USE ANY AMMONIA BINDERS AS THEY WILL COPNTAMINATE THIS TREATMENT. Also make sure to turn off UV during treatment
written by John N Fornaro
Hanover Koi Farms
Written by John Fornaro, Hanover Koi Farms. ALL RIGHTS RESERVED BY HANOVER KOI FARMS, COPYRIGHT © 2018